
The Rift
Pick up chests on both towers on the sides, then proceed to the dungeon #4.
Bestiary Checklist:
Unique Weapons
- Thor's Hammer is the strongest hammer in the game that can only be stolen (rare) from Death Claw.
- Murakumo is the strongest Katana, higher attack power than Masamune and can only be stolen (rare) from Yojimbo.
- Dragon lance from Crystal Dragon.
Item Checklist:
- C-210: Thor's Hammer
- C-211: Hermes' Sandals
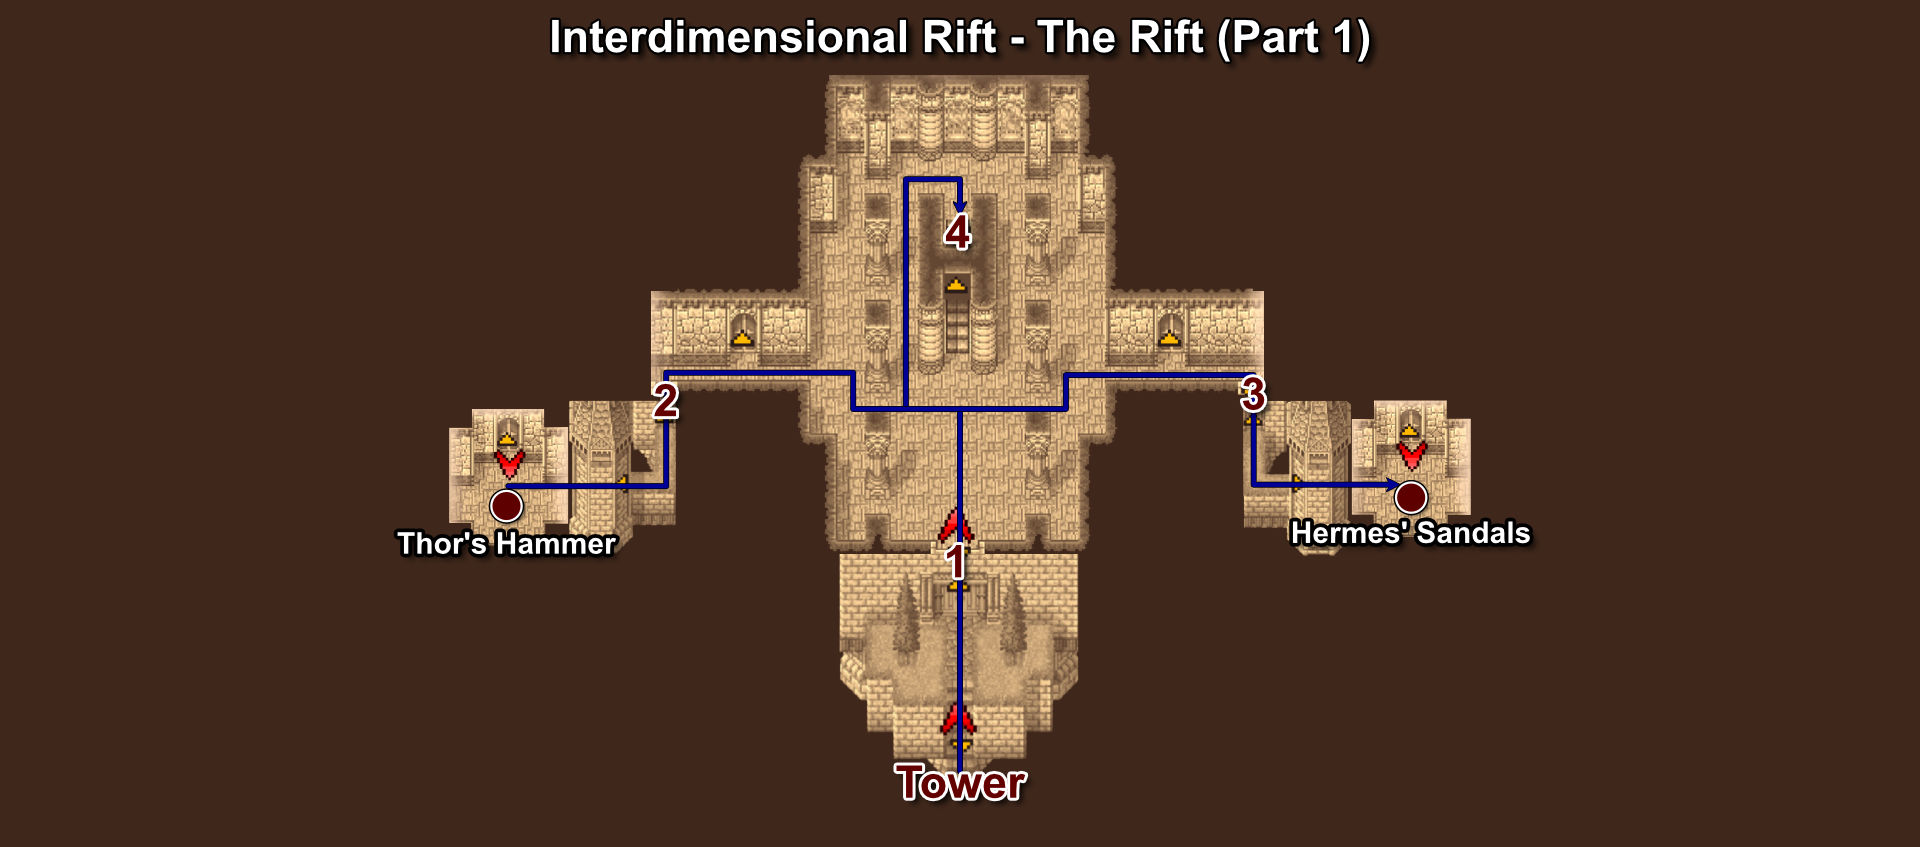
In the dungeon, there are 3 mini-bosses.
- Azulmagia is a master of blue magic. Kill him to reveal a save point.
- Alte Roite (Jura Aevis) are guarding both cells with a chest inside. Each cell has 3 Alte Roite.
- Catastrophe is guarding your exit #5.
Boss: Azulmagia
Steal: Elixir (common), Titan's Gloves (rare)
Note: Titan's Gloves is a unique item that can only be stolen from this boss. Its unique property is immunity to Mini, boosts strength but weakens magic.
This boss knows most of the blue magic and can learn more from you if you cast blue magic on him. There is a very high chance that he will use the blue magic that he just learned from you the next turn. Because of this, you can use Self-Destruct to make him suicide and win the battle immediately.
Another strategy is having 4 Black Magic and keep spamming Bio (he is weak against Poison). I personally like this strategy because you don't have to sacrifice one of your allies and lose ABP.
Boss: Alte Roite (Jura Aevis)
Either magic or physical attacks work well on this boss. After you defeat him, he'll transform into Jura Aevis.
Blue Magic is recommended for the second phase with the combo Dark Spark + Level 5 Death to easily win the battle. If you want to fight the proper way, do not use fire, ice, or thunder because he'll absorb all of them.
Note: you can also prevent Alte Roite from transforming by casting Berserk on him.
Boss: Catastrophe
Guaranteed Drop: Gold Needle
The easiest way to defeat this boss is to cast Float and equip Reflect Ring on one of your allies. Why? The boss's signature attack is Earth Shaker, which deals massive damage; it can be avoided by using Float. However, if at least one of your allies is floating, it will immediately cast another spell called 100 Gs, which removes the Float status on your entire party. The Reflect Ring will bounce 100 Gs back, preventing it from removing Float, hence the boss is stuck in a loop of casting 100 Gs forever.
The normal way is to kill it as fast as possible with your strongest attacks and spells.
Once you kill all the bosses, exit through #5 and make a loop to the other cell for another chest Man-Eater (see the map below), then backtrack to #9.
Item Checklist:
- C-212: Rainbow Dress
- C-213: Red Slippers
- C-214: Man-Eater
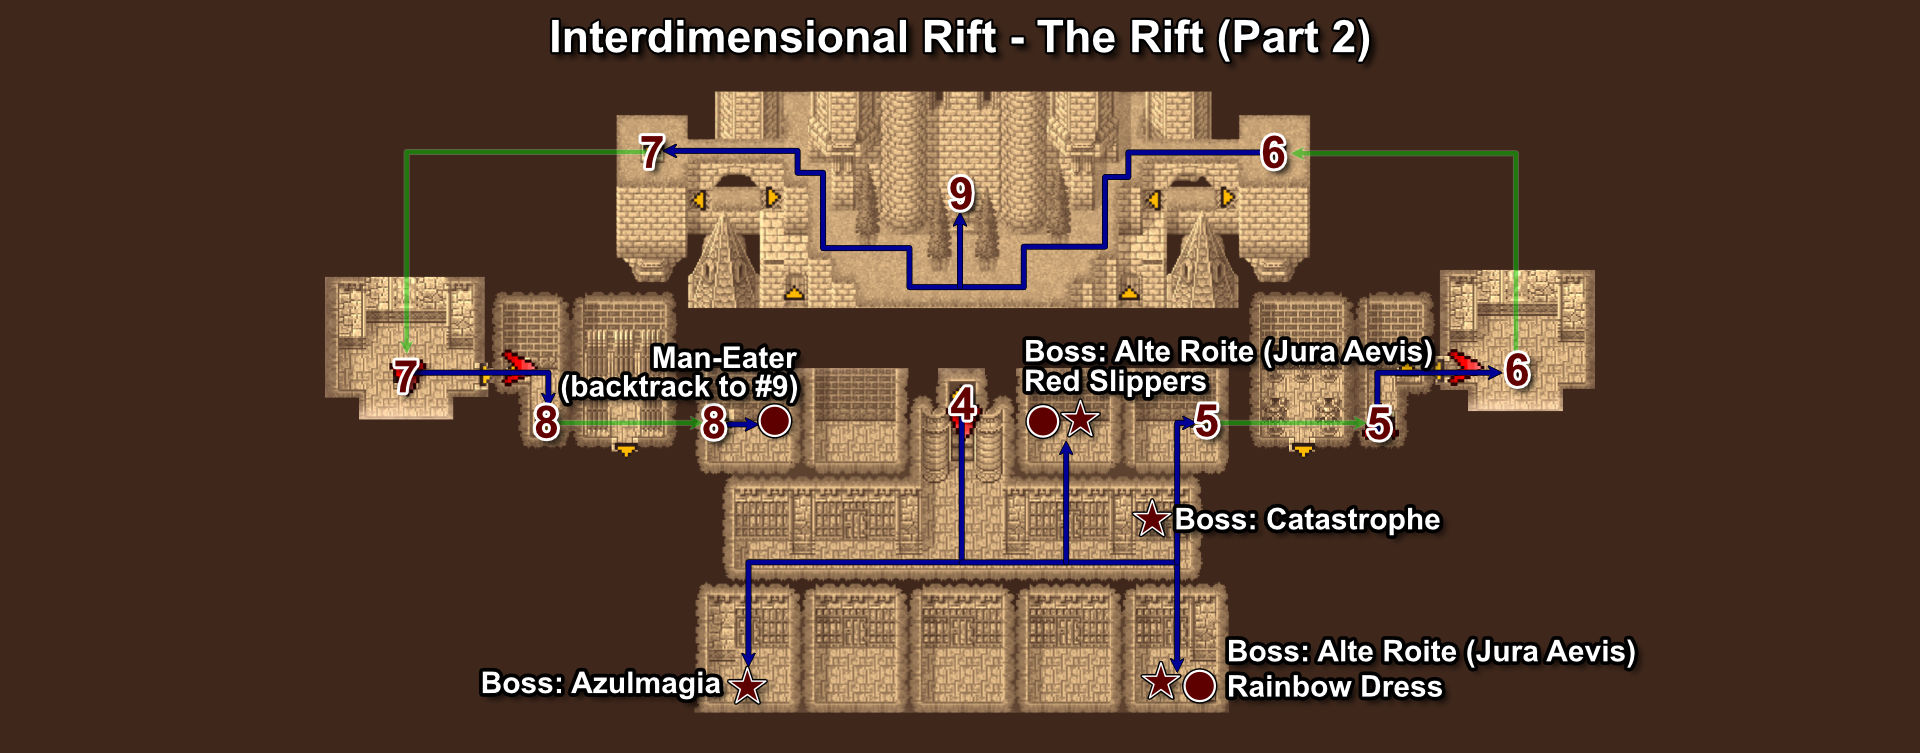
Follow the map below for 2 more boss fights.

Boss: Halicarnassus
Steal: Staff of Light (common), Aegis Shield (rare)
Note: stealing Staff of Light from this boss is the easiest way to get it. This staff is a rare drop from Metamorph, which is a rare encounter in the Interdimensional Rift - Cave at this point.
Another easy boss fight. The boss always starts the battle by turning the party into frogs. Simply heal your party with Maiden's Kiss or Esuna. Then use your strongest attacks/spells until you win. The boss only does critical attacks, which deal a little damage.
Boss: Twintania
Steal: Titan's Axe (2nd form - common)
Drop: Tinklebell (1st form - rare), Murasame (2nd form - rare)
Note: Tinklebell is a unique item that can only be dropped by this boss during the 1st form. Titan's Axe is also unique, but you should've gotten one from Istory Falls already. Getting both items is possible but very difficult and depends on luck because Tinklebell is a rare drop. Murasame is also very rare, but it can be stolen from another monster named Rukh.
Twintania is strong; it counters physical attacks with Tidal Wave and magic attacks with Mega Flare. After a few turns, it'll charge for its signature attack Giga Flare, which can wipe out your entire party. During the charging form, it will lose all of its immunity to ailment statuses, meaning that you can exploit this weakness.
The easiest strategy is to have 4 Black Mages equipped with Reflect Ring + Flame Rod. During the battle, cast Firaga on your entire party. The Firaga will reflect back to the boss 4 times. If the boss counters with Mega Flare, it will again bounce the Mega Flare back at the boss, dealing additional damage. The other 3 Black Mages repeat this process and the boss should die in one turn.
Note: Reflect Ring can easily be stolen from the Fury monster on the castle. Simply walk around #11 (be careful not to step on the stairs to trigger the boss fight).
Second strategy is to exploit its vulnerability during the charging state. You only need one Mystic Knight. Start by charging Spellblade + Break. Then, do not attack and wait until you see the message "Powering up for Giga Flare"; that's your sign to attack with your spellblade, instantly killing the boss.
Note: this boss has a very small chance to drop a unique weapon Tinklebell, which is the strongest bell weapon in the game. Well, who cares about bells?
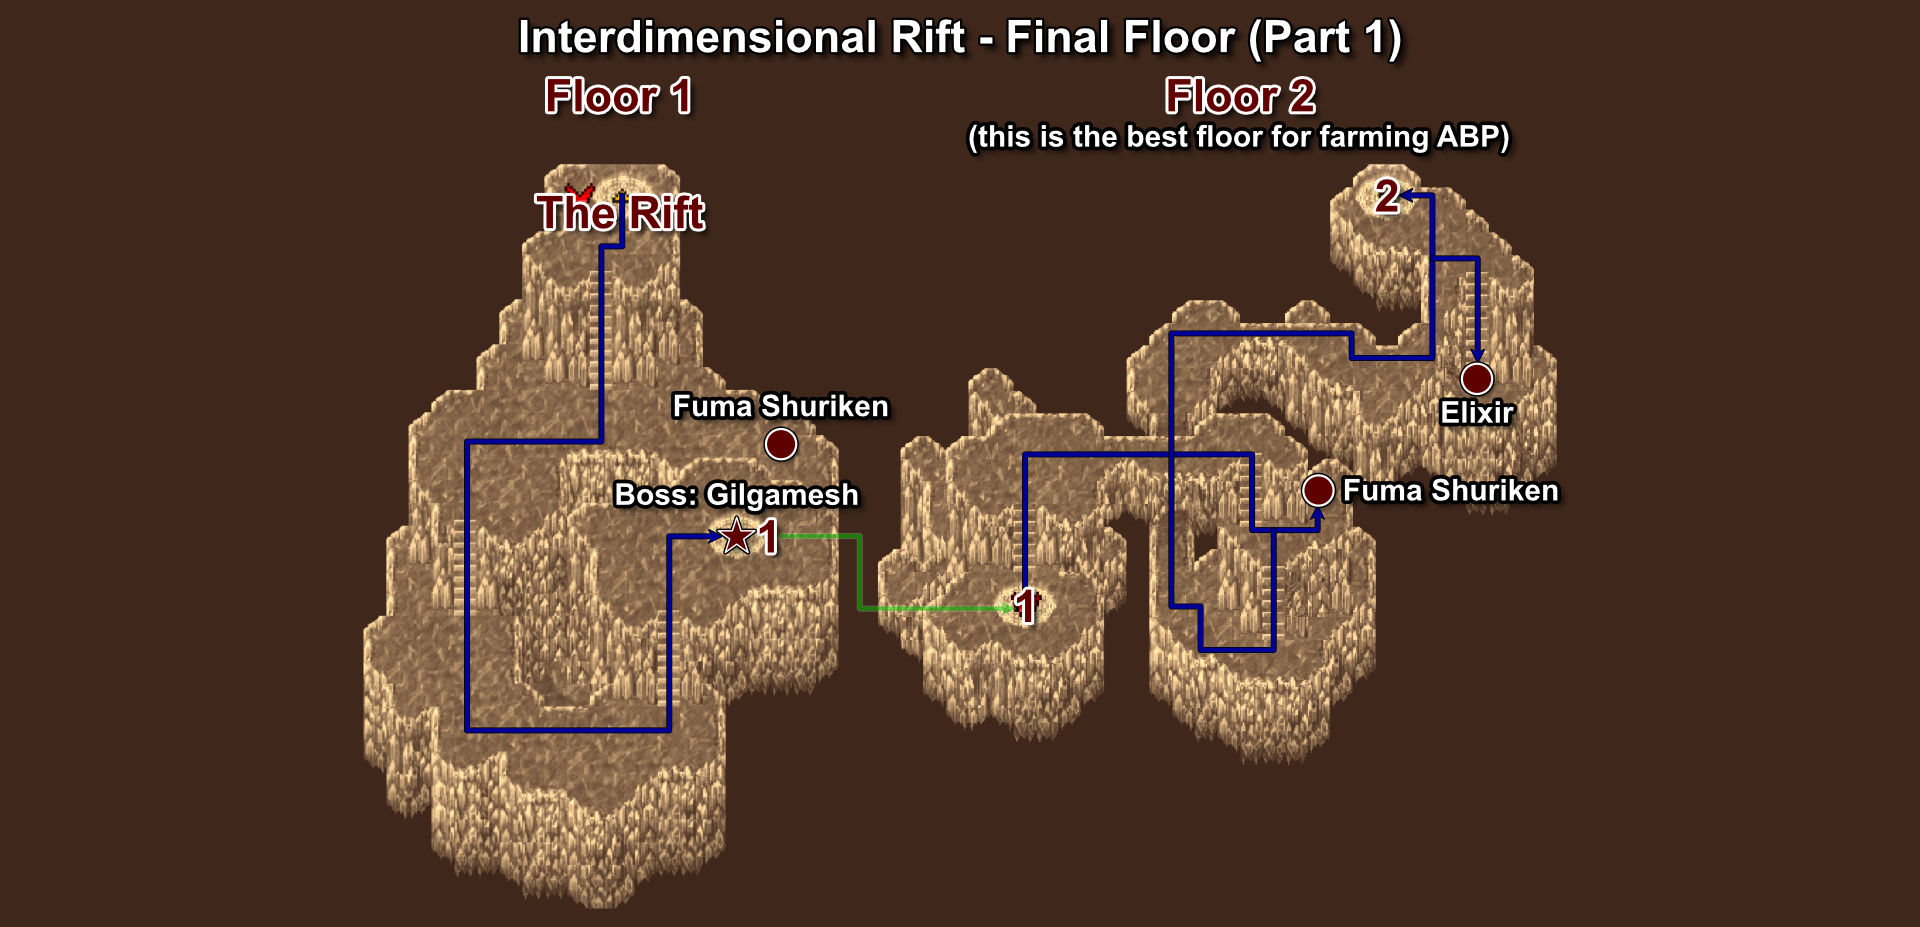
Final Floor
IMPORTANT: Enemies in Final Floor do not give you EXP, but a lot of ABP.
Bestiary Checklist:
You finally made it; this is the final dungeon with 5 floors.
Pick up Fuma Shuriken, then approach the boss standing on the portal.
Boss: Gilgamesh (5th encounter)
Steal: Genji Shield
Not much of a fight. Keep attacking him until he recognizes you, a few dialogues pop up and he then flees the scene. Don't forget to steal Genji equipment from him.
At this point he seems to be on your side. I guess he is mad that Exdeath banished him here.
Item Checklist:
- C-215: Fuma Shuriken
- C-216: Fuma Shuriken
- C-217: Elixir
This part is straightforward. However, DO NOT open the middle chest unless you are prepared to challenge the super-boss Shinryu.
- First, skip the super-boss, pick up Fuma Shuriken, then use the portal to the next floor.
- Kill Necrophobe boss to reveal a Save Point, so that you can use Cottage and make a permanent save.
Blue Magic (30/30): Mind Blast
From Mindflayer
Mindflayer is very common on Floor 3 and it's easy to get.
Item Checklist:
- C-218: Fuma Shuriken
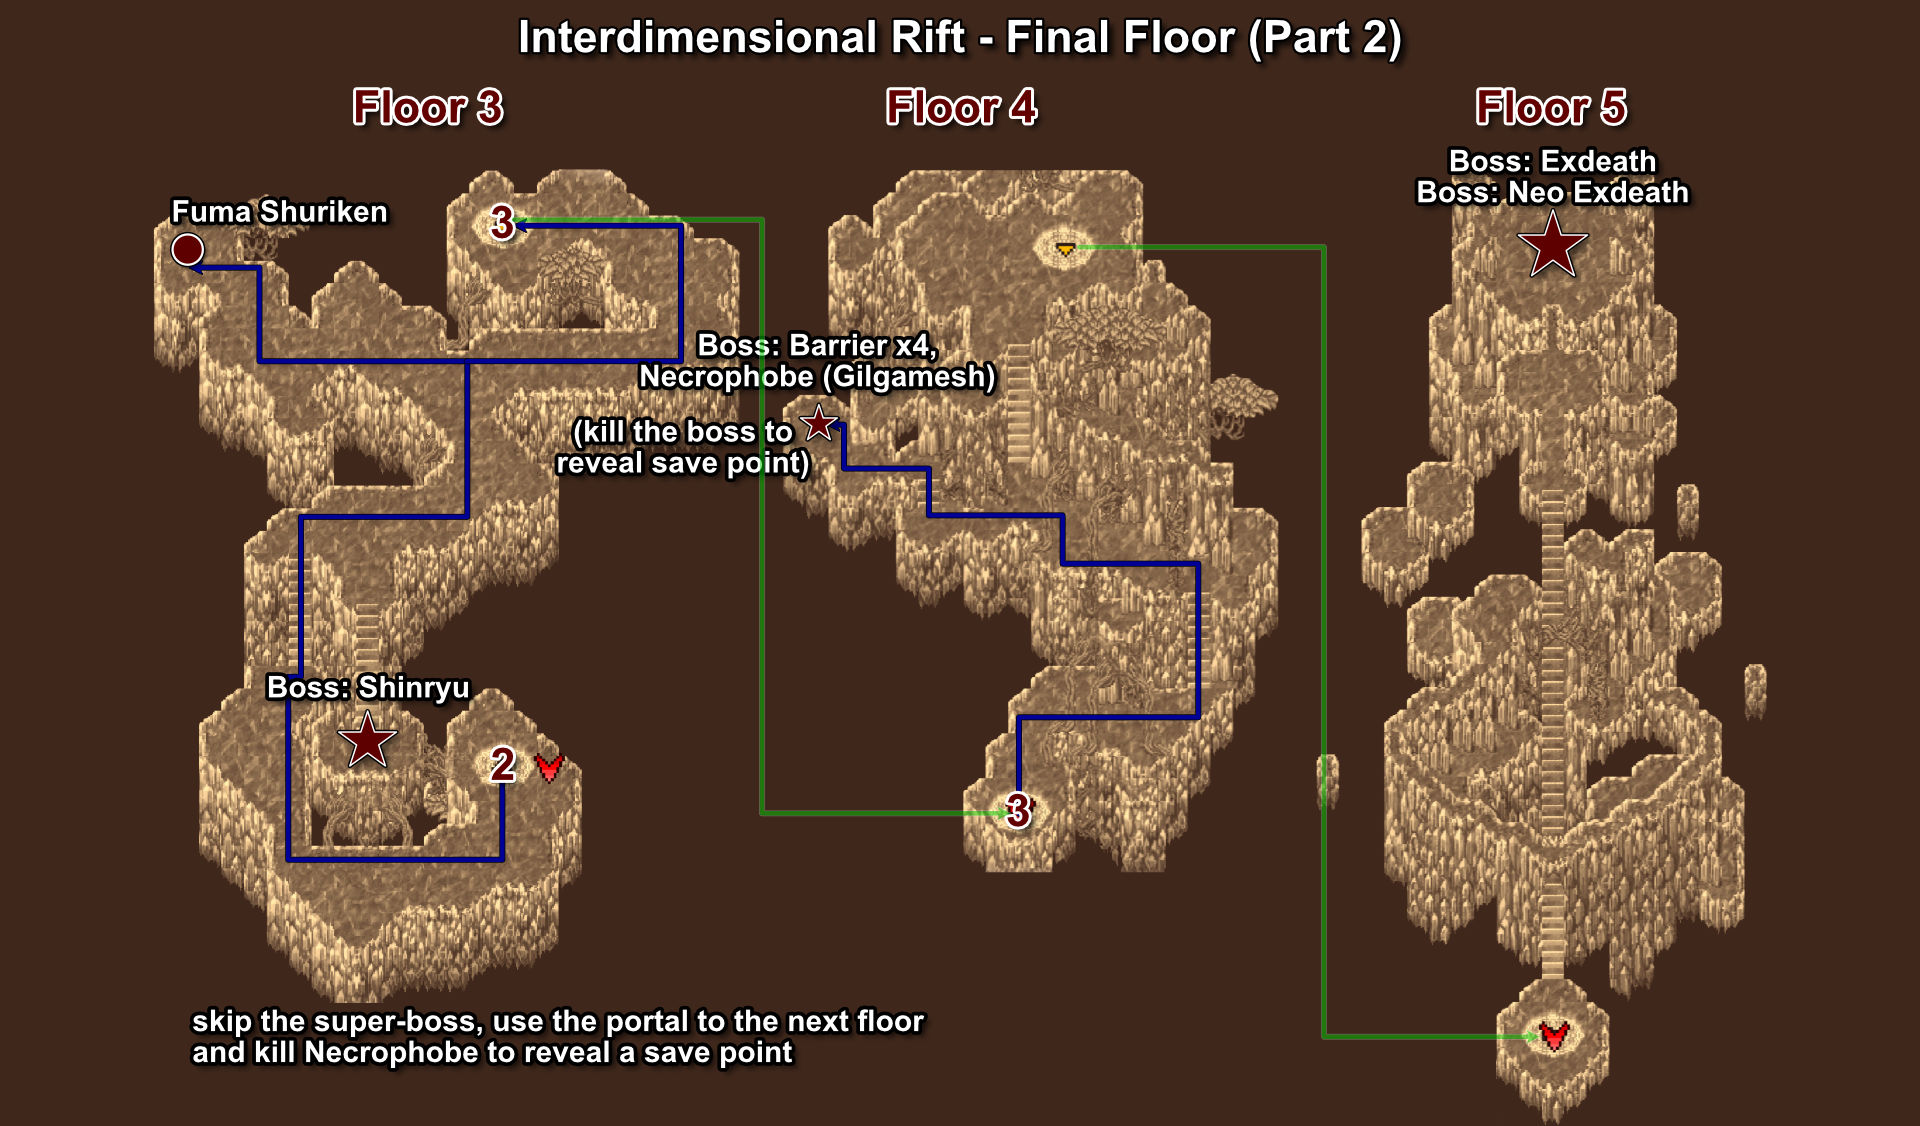
Boss: Barrier x4, Necrophobe (Gilgamesh (6th encounter) - MISSABLE)
Steal: Genji Armor (from Gilgamesh)
This boss relies heavily on his 4 barriers. You need to quickly destroy those barriers before you can damage him.
A good strategy is to use any spells/skills that can bypass Reflect. Zeninage and summons Bahamut are probably the best in this scenario. The barrier has only 8800HP, which can be destroyed in 2 or 3 shots.
Once the barriers are down, use any elemental magic, slowly taking him down to under 10,000 HP; this should trigger Gilgamesh to join the fight. Then you wait (I'm not gonna spoil you... lol).
Note: Gilgamesh won't appear if you kill Necrophobe too fast.
Rest and save your game.