You will lose your Enterprise 2.0. Hence, you will also lose access to sea surface monsters, so make sure that you collect your bestiary.
When you are ready, fly to Saronia and watch a scene. Now that your ship is destroyed, you are basically stuck in the castle area. There are 4 towns, each at the edge of the castle:

- Northwestern Saronia
- Northeastern Saronia
- Southeastern Saronia
- Southwestern Saronia
Once you reappear, go south to leave the castle.
Northwestern Saronia
There is nothing to do here. Simply enter and leave the town to complete the map.

Southwestern Saronia
- Enter the far east house (1). There is a hidden passageway to your left with 11 chests. If you talk to the researcher, he'll summon a Fat Chocobo.
- Leave the house, go to the northeast house (2), and talk to the old man blocking the door. Enter the pub and approach Prince Alus. You'll trigger a fight with 4 Gold Knights.
- Leave the pub and find a staircase into the waterway. Approach the old man standing on a small platform in the middle, surrounded by water.

Chests/Items:
- C-166: Gysahl Greens - east house, hidden room.
- C-167: Gysahl Greens - east house, hidden room.
- C-168: Gysahl Greens - east house, hidden room.
- C-169: Gysahl Greens - east house, hidden room.
- C-170: Gysahl Greens - east house, hidden room.
- C-171: Gysahl Greens - east house, hidden room.
- C-172: Gysahl Greens - east house, hidden room.
- C-173: Gysahl Greens - east house, hidden room.
- C-174: Gysahl Greens - east house, hidden room.
- C-175: Gysahl Greens - east house, hidden room.
- C-176: Gysahl Greens - east house, hidden room.
- I-054: Dragon Mail - talk to the old man on the small platform.
- I-055: Wind Spear - talk to the old man in the southwest corner.
Leave the town.
Southeastern Saronia
There is nothing to do in town except the Dragon Spire, so go straight to the Dragon Spire (1). It is a dungeon with monsters inside, so be careful.

Dragon Spire
All treasure chests are at the top. Go up until you find the chests.
Bestiary Checklist:
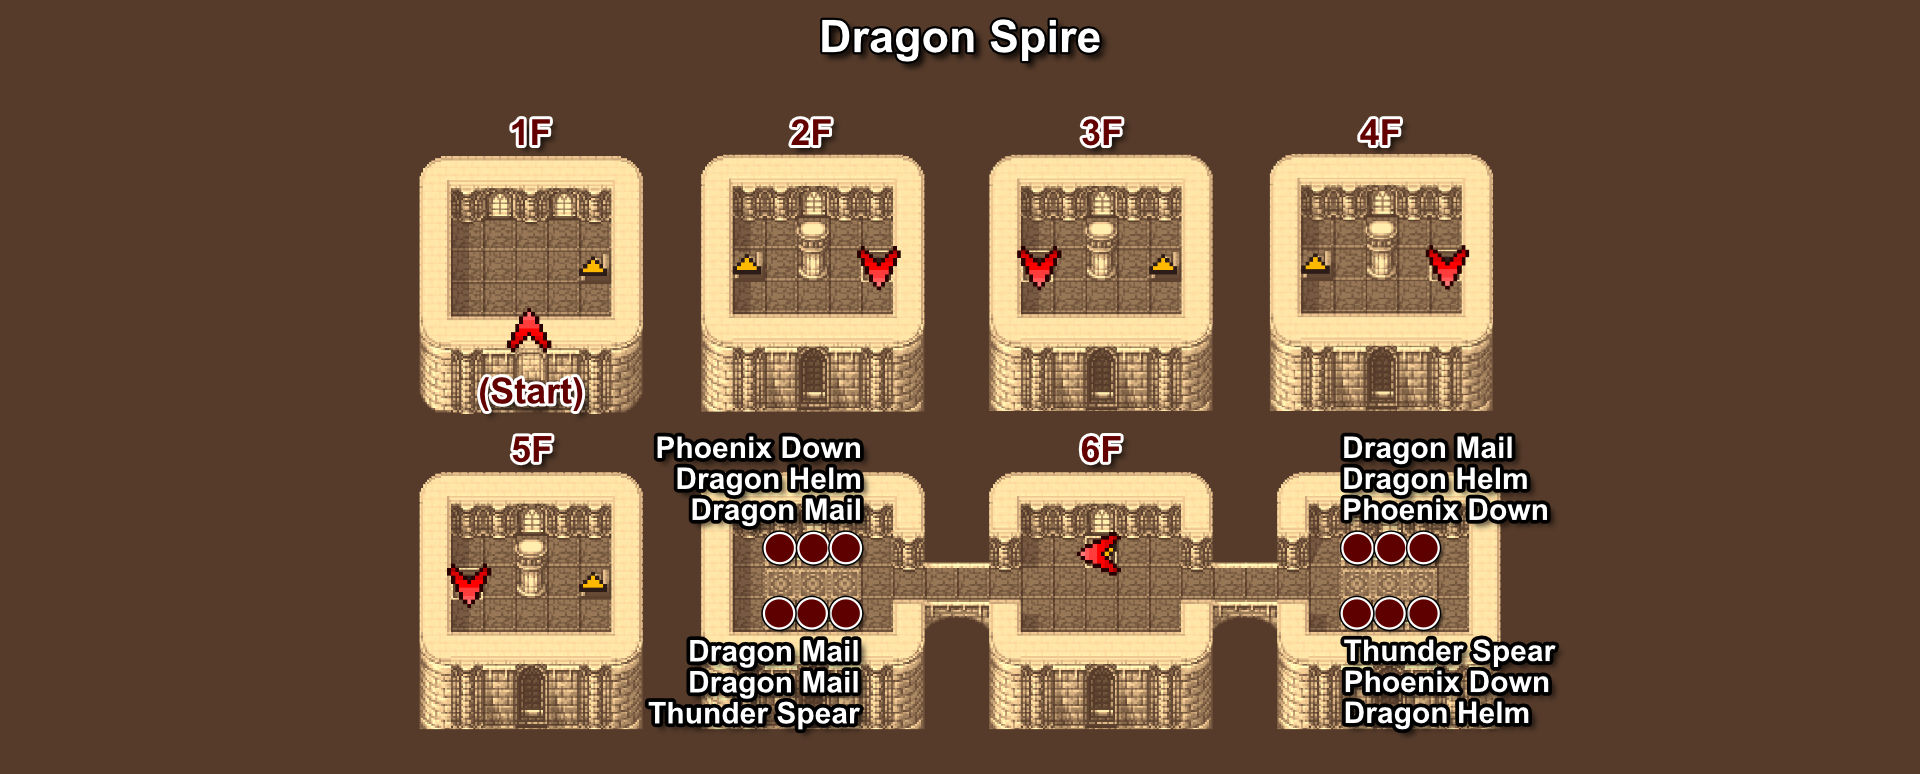
Chests/Items:
- C-177: Phoenix Down - 6F, left area, top-right chest.
- C-178: Dragon Mail - 6F, left area, bottom-right chest.
- C-179: Dragon Helm - 6F, left area, top-mid chest.
- C-180: Dragon Mail - 6F, left area, bottom-mid chest.
- C-181: Dragon Mail - 6F, left area, top-left chest.
- C-182: Thunder Spear - 6F, left area, bottom-left chest.
- C-183: Dragon Mail - 6F, right area, top-left chest.
- C-184: Thunder Spear - 6F, right area, bottom-left chest.
- C-185: Dragon Helm - 6F, right area, top-mid chest.
- C-186: Phoenix Down - 6F, right area, bottom-mid chest.
- C-187: Phoenix Down - 6F, right area, top-right chest.
- C-188: Dragon Helm - 6F, right area, bottom-right chest.
Northeastern Saronia
There is a powerful boss inside the castle, and you are highly likely to die in 2 strikes when the boss uses its thunder spell. The easiest strategy is to kill the boss as quickly as possible. To do so, you'll need 4 Dragoons.
You should have obtained 1 Wind Spear and 3 Thunder Spear from the Dragon Spire. Now, go to the weapon shop in the northwest and buy 4 more Wind Spears. Use the INN to rest if needed.
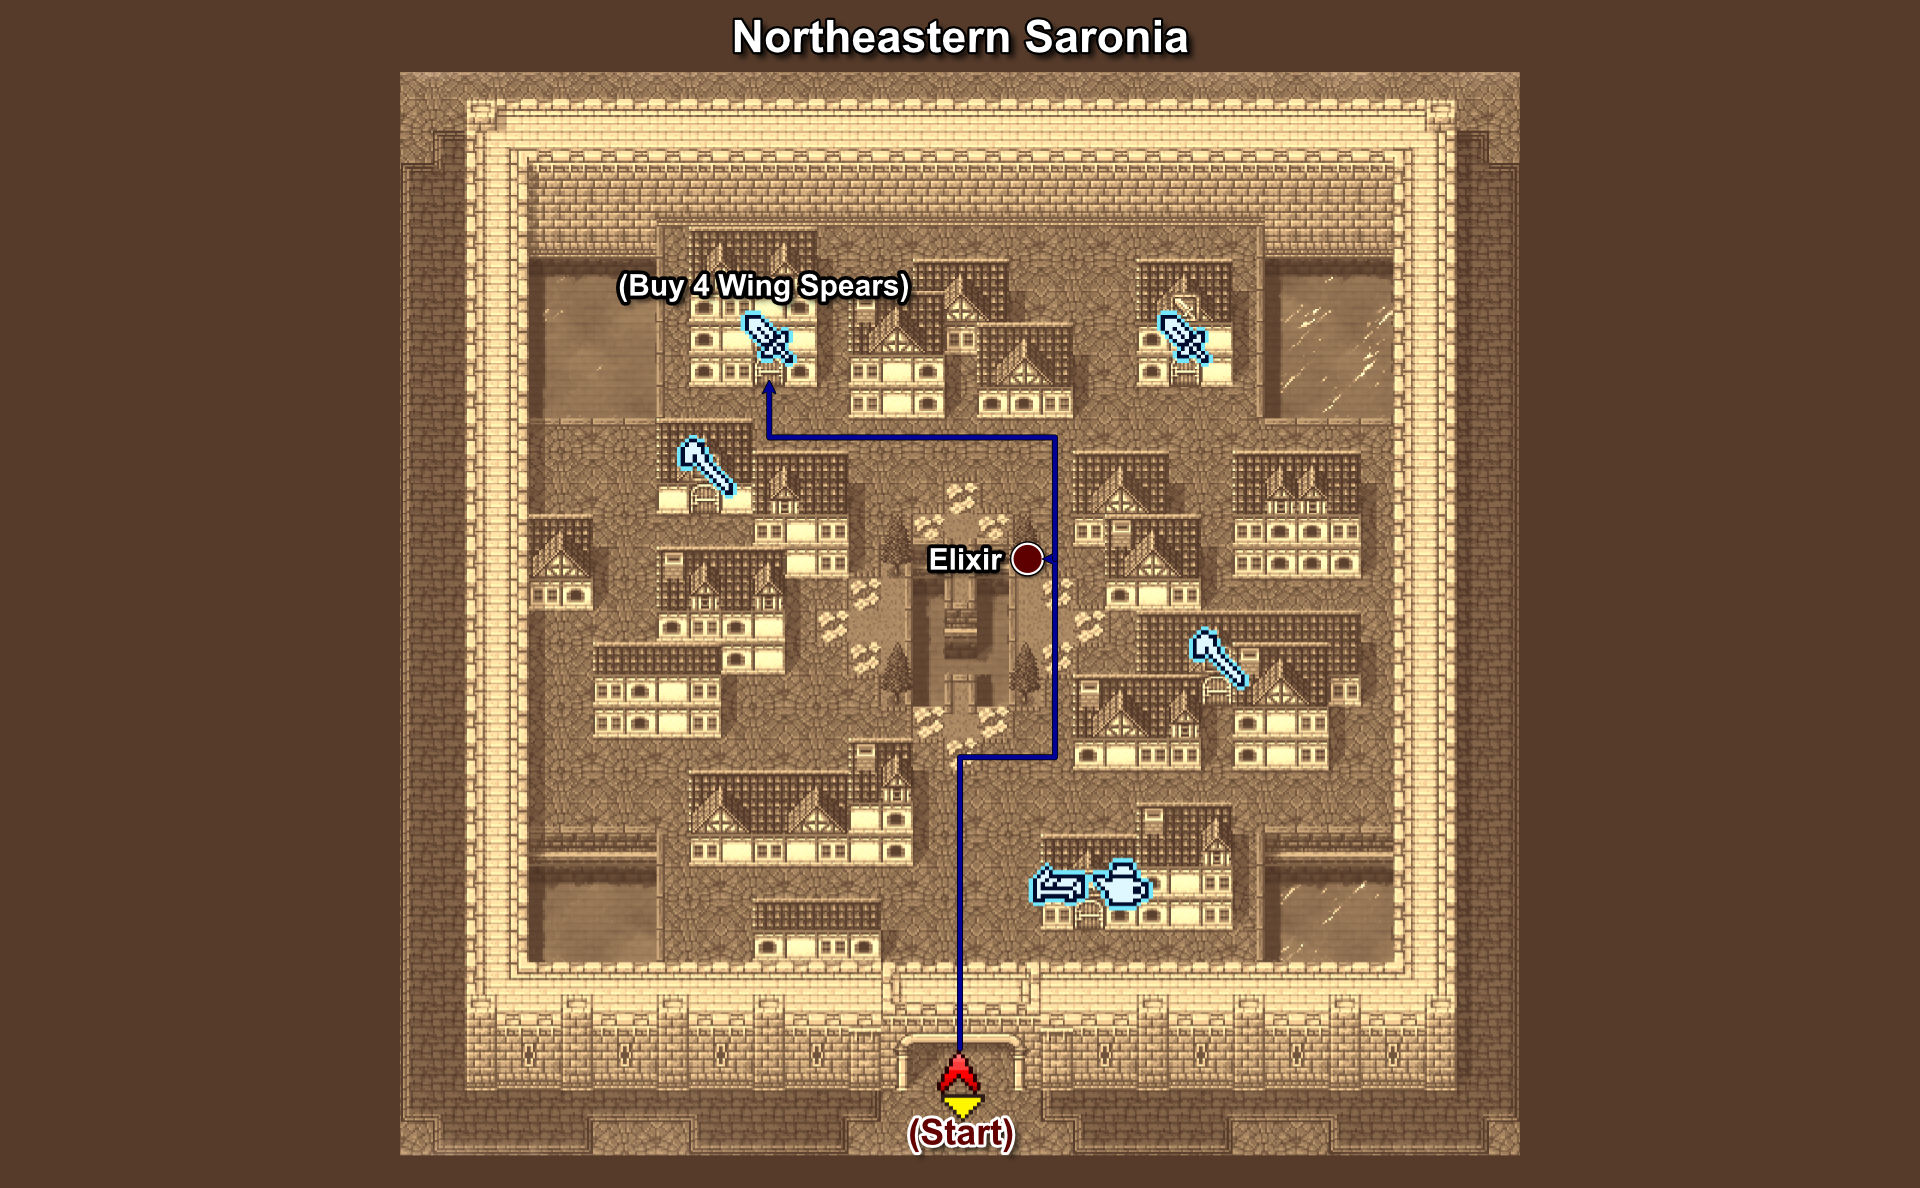
Chests/Items:
- I-052: Elixir - middle park, top-right tree.
Castle Saronia
As soon as you enter the castle and talk to the guard, you will trigger a boss after the cutscene.
Preparation:
- Change everyone's job to Dragoon.
- Equip the best weapons and armor you've got.
- You should have 5 Wind Spear (4 purchased from Northeastern Saronia) and 3 Thunder Spear.
Boss: Garuda
This boss is strong, but not as strong as the 3D version. You should have no trouble killing it in 1 or 2 turns.
- Immediately start using Jump when the battle starts.
Saronia is at peace once again. All Weapon and Magic shops in the towns are open for business again, so I suggest shopping around before leaving. Notable spells include Blizzaga, Thundaga, Protect, Haste, Curaga, etc.
- Head into the right wall; there is a hidden passageway leading to 12 chests.
- Use the stairs to go down for another 6 chests.

Chests/Items:
- C-189: Ice Staff - 1F, 1st row, 1st chest.
- C-190: Thorian Hammer - 1F, 1st row, 2nd chest.
- C-191: Rusty Mail - 1F, 1st row, 3rd chest.
- C-192: Hi-Potion - 1F, 1st row, 4th chest.
- C-193: Rusty Mail - 1F, 2nd row, 1st chest.
- C-194: Main Gauche - 1F, 2nd row, 2nd chest.
- C-195: Golem Staff - 1F, 2nd row, 3rd chest.
- C-196: Hi-Potion - 1F, 2nd row, 4th chest.
- C-197: Rune Bow - 1F, 3rd row, 1st chest.
- C-198: Rusty Mail - 1F, 3rd row, 2nd chest.
- C-199: Scholar Hat - 1F, 3rd row, 3rd chest.
- C-200: Rusty Mail - 1F, 3rd row, 4th chest.
- C-201: Rusty Mail - B1, 1st row, left chest.
- C-202: Viking Helm - B1, 1st row, right chest.
- C-203: Earthen Bell - B1, 2nd row, left chest.
- C-204: Dragon Helm - B1, 2nd row, right chest.
- C-205: Gaia Vest - B1, 3rd row, left chest.
- C-206: Viking Mail - B1, 3rd row, right chest.
- C-207: Phoenix Down - B3 (West Room), top chest.
- C-208: Phoenix Down - B3 (West Room), bottom chest.
You can change back to your proper jobs after defeating the boss.
Exit the castle to board your brand new airship. At this point, you've lost the ability to sail the sea.